So It’s been about a year or so since I've written any Facebook applications for clients, and in that time quite a lot has changed in the space. There are quite a list of available libraries you can use to write Facebook applications in .Net with, so it can be sometime daunting to pick one as your favourite. This can be further complicated by the fact that for a lot of people, when they first go to write a Facebook application some of the jargon thrown around can be confusing when you know nothing about the Facebook API – what approach should you take? does having ASP.Net MVC or Silverlight support make the library a good one?
In 2007 Microsoft made the great move of releasing their own sponsored ASP.Net SDK for the Facebook API. This library is now up to version 3.02 and is becoming quite mature. With a beta released for version 3.03 it keeps on charging a great path for .Net developers who want to dip there toes in to developer a Facebook application. I have used this library over the years with great success, and recommend it a lot to people wanting to dip their Facebook-development toes in – whether it be in ASP.Net WebForms or ASP.Net MVC.
Facebook API Background
If you’ve never created a Facebook app, I'll just cover some background.
You can signup for a Facebook API account by simply having a Facebook account and visiting the Facebook Developer page.
There are two types of Facebook applications; FBML applications and Canvas iFrame applications. They both basically run by showing the user an iFrame of your website inside Facebook. A canvas iFrame application shows yours site directly to users, and if you want to show any of the Facebook widgets, they are rendered using JavaScript. An FBML application on the other hand is shown by Facebook’s servers through a proxy style situation where they fetch your page and parse it for FBML (their own markup language – Facebook mark-up language) and display widgets (things like a users friend picker) on the server side by replacing tags you have in your pages with actual HTML.
There is a great description including graphics of how the requests work can be seen here.
Get Setup ASAP!
So lets take a quick jump through taking a look at how easy it is to get up and running with the Microsoft’s Facebook SDK. I’m going to show you how to setup a Canvas iFrame application that simply displays a users Display Name. This will allow you to get your head around the application process, how to debug it, and any things you should be aware of.
Firstly go and download the latest version of the Microsoft library here.
If you haven’t signed up for Facebook yet do so here.
I have created two quick tutorials, one for ASP.Net WebForms and one for ASP.Net MVC – choose which one you prefer, they both are nearly identical.
ASP.Net WebForms Example
Start a new Empty ASP.Net web forms project.
Add a Reference to Facebook.dll and Facebook.Web.dll (they are in the Microsoft Facebook SDK zip download)
Create a new “Default.aspx” page
Add a literal to you page and give it an ID
<asp:Literal ID="litDisplayName" runat="server" />
Now switch to you code behind and change the base class of the page to Facebook.Web.CanvasIFrameBasePage
Inside the pages page load event set the authentication requirements to true.
Your pages code should now look like this:
public partial class Default : Facebook.Web.CanvasIFrameBasePage
{
    protected void Page_Load(object sender, EventArgs e)
    {
        base.RequireLogin = true;
    }
}
Now what we want to do is display a message to users, so we will load the users profile display name into the literal by using the API class.
public partial class Default : Facebook.Web.CanvasIFrameBasePage
{
    protected void Page_Load(object sender, EventArgs e)
    {
        base.RequireLogin = true;

        litDisplayName.Text =
            String.Format("Hello {0}", Api.Users.GetInfo().first_name);
    }
}
Now we have completed Facebook iFrame page that will require users to be logged in to view and will great them with their first name.
The last thing you need to do is make sure that this website runs on port 80 under the project properties, so that when you run this app, that the URL you enter further down into Facebook, redirects properly to your local machine.
ASP.Net MVC Example
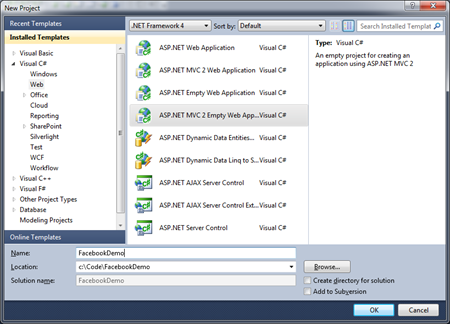
Start up Visual Studio and Start a new Empty ASP.Net MVC project

Add a new controller named “HomeController”. Inside this controller, replace the index method with the following code. This declares that a user must be logged in (from the method attributes) and then loads the users name into a viewdata entry.
[FacebookAuthorization(IsFbml = false)]
public ActionResult Index()
{
    Api Facebook = this.GetApi();
    ViewData["DisplayName"] =
        String.Format("Hello {0}", Facebook.Users.GetInfo().name);

    return View();
}
Now create a new view for this controller’s Index method and enter the following code:
<html>
<body>
    <div>
    <%=ViewData["DisplayName"]%>
    </div>
</body>
</html>
You're now ready to rock!
Facebook Application Setup
Once you’ve chosen which ASP.Net web application to use, and have an application that builds, its time to setup your Facebook application so that you can debug it locally. So that we can run the application we need to grab an application “secret” and “ApplicationID” from Facebook to continue.
Login to your Facebook account – http://www.facebook.com
Visit Facebook developer section - http://www.facebook.com/developers/
Create a new application and give it a name
![]()
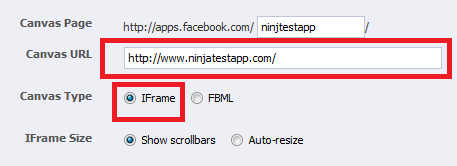
Under the Facebook Intergration tab give your application a canvas page URL. Enter the Canvas URL for your application as a random .com URL simply for development purposes (I'll use the domain NinjaTestApp.com for this example), and set your canvas type as IFrame. The reason I'm saying to use a random .com name is that we are going to then add a host file entry for this domain to your local machine that points to 127.0.0.1 (if you don't know how to do this go here).

Now take your newly created applications Application ID and Application Secret as displayed on Facebook and copy them into application setting variables for use by the Facebook SDK. You also need to create an application setting for your Callback URL so that the site knows where to ask Facebook to redirect back to after login.
<appSettings>
    <add key="APIKey" value="XXXXXX"/>
    <add key="Secret" value="XXXXXX"/>
    <add key="Callback" value="http://www.ninjatestapp.com"></add>
</appSettings>
Now that you have done this, along with your host file entry, you should be able to successfully launch your application from within Visual Studio. If you are not logged into Facebook, your browser should redirect to a Facebook login page, and on successfully logging in, you should see your display name within a Facebook iframe.

Too Easy!
Summary
Hopefully you’ll be up and writing Facebook apps in no time at all. Have an explore around the SDK’s namespaces – special mention should be made of the API class and its properties and this matches the Facebook API exactly.
All the code used in this post can downloaded here.